Showing posts with label paper. Show all posts

Wednesday, August 14, 2013

Homemade Sign

Last week a friend of mine came back home after about a month in Europe. Another friend and I were thrilled to pick him up at the airport and we decided it would be fun to make one of those cheesy welcome home signs you always see in the movies. 

It began with a sketch of what the sign should look like. This also helped me catch spelling and logistical mistakes before we went large-scale.

Then, to the big blank page...

The plan was to have a faux bunting feel so I made a template triangle then traced it to get all the other triangles. Since we were being cheesy, I wanted the sign to have a playful/childish look so the triangles were free-hand cut with an X-acto making each one a bit different.

We just used glue sticks and my trusty bone folder to attach everything.

The letters were all hand drawn and colored; again to keep a playful look.

The finished sign was a hit! Sadly, I do not have an image of Sergei actually happy to see it, but it helped him find us, I swear.

Sunday, May 5, 2013

P is for Pinwheel

Besides teaching and working, I've also spent the past couple of weeks working on a new product/project that I'm calling P is for Pinwheel.

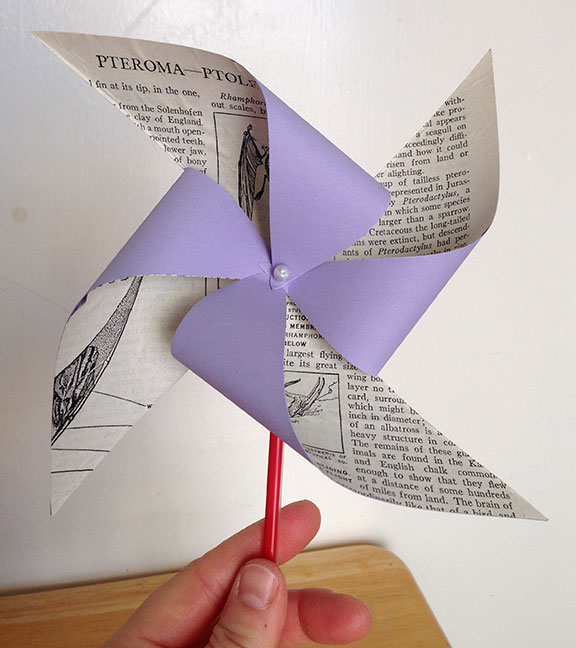
Inspired by the Altered Book show at the Marin MOCAKayte Terry, and the idea of how books are read and interpreted, I decided to put a letter P encyclopedia, found at a San Francisco Public Library book sale, to use.


I cut down pages from the encyclopedia and pasted them on solid color paper, did some folding and measuring, and cut them just so, so that they could be twisted and pinned into a pinwheel shape.


The finished paper wheel was stuck to a straw for a lovely twist on an old favorite. These are a bit more fragile and don't spin as freely as your standard pinwheel but I think they're more fun and informative.

Some of you may be wondering how a book lover such as myself could sacrifice a book in this way. Let me explain. This particular reference tome had been orphaned. This means it was separated from the rest of the set it came from and, not being a first edition or otherwise rare or antique, it had no historic value. Having lost its brethren, it had little to no value for resale and would have been destined for the trash or a creative reuse center had I not purchased it. I enjoyed being able to give it new life and look forward to sharing the pinwheels with others to see how they interpret this book in its new form.


If you're interested in having an encyclopedia pinwheel of your very own, I'll be selling them at my booth (neon sprinkles studio) at Patchwork Oakland on May 12 (Mother's Day).

Wednesday, January 2, 2013

Home Improvements


Life has been pretty hectic since July and I feel like we never fully moved in to our new place. We've taken our past few days off to make a few improvements to our apartment. 


First, I organized our bookshelves. Including adding new sections for artists' books, zines, and comics.


The studio has been feeling pretty crowded so we moved my yellow reading chair into the living room,


right by the paper fire I created to make our walled up fire place feel nice and cozy.


Tired of the kittens constantly knocking over our piles of DVDs, we found some cheap, fun, wall mounted DVD racks at Ikea that balance the DVDs between each crossbar and the wall.


For inspiration in the mornings, and when entering my studio, I hung my newest artwork, from Courtney Cerruti, on the small wall across from the bedroom door, and right by the studio entrance.


In the studio we mounted some new shelves to help me organize. The shelves were repurposed from a kitchen cabinet our friends discarded when they renovated their kitchen. 


The overhead lighting in my art room is not very good, especially for detail work, so we installed a few new lights above the window that shine down directly on the work table. They are great! Now I feel like I can make work after dark, which is especially important since after work is my main art making time.

Wednesday, November 14, 2012

Business Cards


Last week I designed and printed my first ever custom business card job. I usually only make things for myself, so it was a bit challenging and nerve racking, but also oh-so-fun! 

The cards were for friend and photographer, Josh Smith.

Polymer plate, all locked up and ready to go

All packaged and ready to go

Friday, September 28, 2012

Journaling Care Package


Things have been crazy this month, especially because this past weekend my job held its biggest event of the year, where we print large scale lino cuts in the street. Fun as it was, now that the event is finished, I'm able to leave work on time and focus on making things of my own. My first finished project is this little care package, made for my summer cat sitter. The package contains a journal and two notebooks made from paper scraps. She's an avid journaler and list maker so I thought this would be just thing to get her second year of college started off right.

Sunday, July 8, 2012

Studio Tour

My non-digital cameras on the work table, in easy reach should a photo present itself

I'm excited to share this round of images because, this past week I finally got my art making room set up. It may technically be a studio but I prefer 'art making room' because it really is more of a room (probably originally meant to be an office or child's bedroom) than a studio, which conjures up thoughts of a space where you can do whatever you want, make huge messes, have large equipment, etc. and my room is none of those things. If I ever want my security deposit back, I have to keep things relatively contained. Still, it's the first dedicated art making space I've ever had, and I'm happy to have it.

The view from my preferred spot at my work table (hopefully we'll have some plants and flowers in the yard soon, so the fence line is a little more comely)

There's this little nook in the room, and I have an 'arts and crafts books (instructions and zines)' book shelf

Some stuff on the work table (the light in this room is actually really good all day long, it's my exposure that was off- oops)

A drawer of tools and supplies with a bunch of collage material, magazines, and book making scraps organized on top (I spray painted the containers on the left)

I have precious little wall space that I want to save for hanging works in progress and the work of other artists I find inspiring, so I decided to hang my rulers between two of the windows

My reading/break chair, in the nook, surrounded by rolls of paper and other stuff

A little glimpse of downstairs and another box of collage material

As you can tell, I really like these wooden boxes I spray painted, mostly because of the spray paint

There is no closet in the room, 5 windows, and not much wall space, so I had to get creative about storing things. I got a bunch of these wooden boxes at Ikea. They are really hard to put together but handy.

My work in progress cube. Hopefully it'll continually rotate as I become a creating/art making monster!

The top of my art supply cabinet with my trusty sewing machine and some more of the wall cubes on the right

A better view of the cubes. I have Gocco printing supplies up top, paper in the middle, and books to collage with on top of the bottom most cube

Tuesday, May 1, 2012

Scrap Notebooks

Embossed camel notebook

After cutting down all the paper for the workshop I'm teaching this week, I was left with a lot of scraps that weren't good enough for class but were too good to throw away. 

So, I admit it, I skipped class on Saturday, pulled out my embossing gun, rubber stamps and embossing powder, and made little Japanese stab notebooks from the scraps.


Thursday, January 12, 2012

More Illustrations

Some more illustrations from the workshop handouts that I'm working on. Text will be added to the images for the final version.


Sunday, January 1, 2012

Journals Galore!


Though I've been making simple book structures for years, in 2011 I learned how to bind multiple signature hard cover books. As a result of this new skill, I got my first-ever commissioned job and I've decided that all my relatives will get journals for the holidays. Here's a chronicle of the journals I've been making over the past few weeks.

 All books start out as folded paper

My friend's daughter is a freshman in college and enjoys journaling so I was asked to make a journal for her. I got to use bright colored and patterned materials, which made this project a lot of fun.

First, all the pages had to be trimmed down,

then they were sewn together. I used a link stitch so the spine was a bit wider, in case anything was going to be glued inside in the future.

I added bright end bands and a marker ribbon for added flare.

After lining the spine, it was time to make the cover...

The spine cloth and corners get added first. My friend asked that the spine and corners were different, to maximize the colors on the book.

Some grey hounds tooth, Japanese paper completed the cover.

All that was left was to glue in the book block and voila, a finished journal. (the newsprint hanging over the edges was a temporary blotter to absorb the moisture from the glue)

While I was shopping for materials for this journal, I found some other great papers and couldn't resist buying them and putting them to use in books for my relatives.

Sewing the yellow argyle book

Yay, argyle journal complete!

I had some leftover orange book cloth so I decided to make a shiny green and orange journal.

I think the turned-in corners look like fish tails!

The finished book...

with some hot pink end sheets as a nice surprise when the book is opened.