Showing posts with label handmade. Show all posts

Wednesday, April 15, 2015

Punctuation Coasters


Historically known as 'beermats', coasters first came into use in the 19th century and were originally used to cover drinks to keep out bugs and debris in dirty bars. Now, everyone knows coasters as the objects you set your drinks on to protect a table surface and they are often covered with advertisements for restaurants, bars, beverage companies, etc. 

Last fall, I made a coaster project of my own. Here is a sampling of images from throughout the making of the project, interspersed with my artist statement. For images of the complete finished project, check out the gallery on my website. 


Punctuation Coasters is a functional book arts project; meaning that it acts not only as a work of book art to view, but also as a set of functional tools, coasters, intended for use by the possessor. Despite having a cover and colophon, this book is not bound in the traditional sense, but rather it exists as eleven coasters that break down and celebrate the building blocks of a sentence: punctuation. 
Every project begins with make-ready, as in, making the press ready for printing. Despite it's simplicity, I knew this was going to be a detailed project with a lot of press changes (due to the size difference, the wood images and smaller lead type could not be printed at the same time if I wanted the best impression from both) so I started by cutting a set of new tympans for the best quality printing throughout the project.

Each punctuation mark; ampersand, colon & semi colon, comma, ellipsis, exclamation point, hyphen, period, question mark, quotation marks; has a coaster of its own to showcase its importance.

This project was letterpress printed using a tabletop platen press in the autumn of 2014. All text is hand-set Stymie lead type of varying sizes and styles. All punctuation is wood type. This book was made in a (sold out) edition of 25 with 3 Artist's Proofs. 
The colophon was hand-set and made up on the spot. It took over an hour to set and only about 5 minutes to breakdown and redistribute after printing
Randomly going through the wood type collection at the San Francisco Center for the Book and finding a drawer full of punctuation, is actually what prompted this project
So much Stymie! It is one of my favorite fonts and I'm lucky to have had this collection to work with

Wednesday, August 14, 2013

Homemade Sign

Last week a friend of mine came back home after about a month in Europe. Another friend and I were thrilled to pick him up at the airport and we decided it would be fun to make one of those cheesy welcome home signs you always see in the movies. 

It began with a sketch of what the sign should look like. This also helped me catch spelling and logistical mistakes before we went large-scale.

Then, to the big blank page...

The plan was to have a faux bunting feel so I made a template triangle then traced it to get all the other triangles. Since we were being cheesy, I wanted the sign to have a playful/childish look so the triangles were free-hand cut with an X-acto making each one a bit different.

We just used glue sticks and my trusty bone folder to attach everything.

The letters were all hand drawn and colored; again to keep a playful look.

The finished sign was a hit! Sadly, I do not have an image of Sergei actually happy to see it, but it helped him find us, I swear.

Saturday, May 4, 2013

Lately

Things have been quiet on the blog because I've been quite busy in the real world. 


At the end of April I taught a session of Introduction to Bookbinding at the San Francisco Center for the Book. I say this after every class but, April's workshop was the best one yet! One of the things I really enjoy about teaching bookmaking is that it's such a universal object form that everyone can understand (even the e-reader folks). In this particular workshop I had the pleasure to teach bankers, lawyers, art students, and even a database manager!


A few days after the workshop I was back at the San Francisco Center for the Book for an evening of simple bookmaking demos at the grand (re)opening (a big open house celebrating the move to a bigger and better building). 


I spent the night teaching visitors how to make maze, or meander, books. These are fun, simple structures made out of a single sheet of paper. I like them because they can open in any direction and have all these secret little spots to discover and they can also be flattened to view a single image all at once, instead of page by page (like this one, made out of a photocopied map of Michigan). 


Just some of the happy folks with their aMAZEing books!

Not sure if I remembered to mention it but, on Mother's Day, I will be a vendor at Patchwork Oakland! It will be the first time I have an entire booth space to myself and I couldn't be more excited. I've made some new products for the show (just wait until tomorrow's post) and Charlie even built me a folding wall to ramp up my display.


I've been working hard to get the word out about the show (I hope you'll stop by!) and one way I decided to invite folks was by seinding out customized event postcards. 


With scrap paper, washi tape, scissors, a hole punch, and some kitchen twine to tie it all together (craft pun alert!) I made these fun little invites. I have a few left over, if you'd like one of your very own, let me know!

Saturday, March 30, 2013

Notebook Spotting

After teaching Networking and Notebooks at Craftcation last week, it was fun to spend the weekend 'notebook spotting'; seeing how folks were using the notebooks I helped them make. 

Notebook, ready for action

 Full of notes!

 A little dinner note taking

 A few happy notebook makers

A handmade cereal box cover notebook taking center stage alongside a store bought journal

Sunday, September 30, 2012

Domestic Project


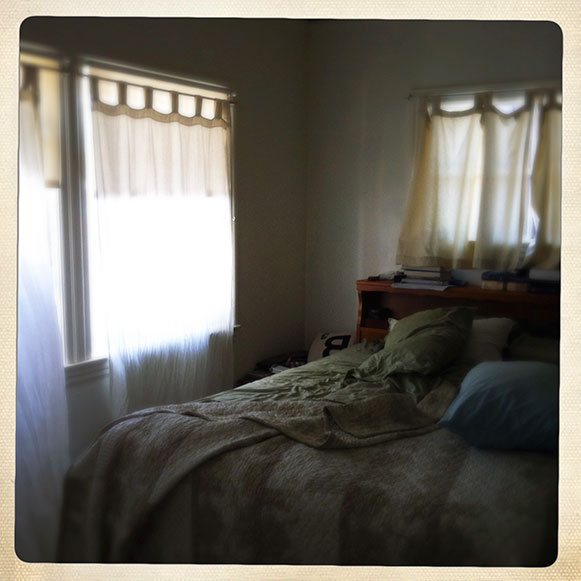
Today was my first Sunday in a long while where I had absolutely nothing to do. So I decided to make curtains for the bedroom.


Our bedroom had curtains when we moved in but they were just your basic off-white color and, since we haven't hung a lot of artwork in the room yet, I felt like we needed to add some color and spice things up.


This wild fabric came from Ikea. It was from a set of ready-to-go curtains but, since we have 2 long windows and 1 short one in the bedroom (and kittens that like to climb curtains), I customized them a bit. 


I cut the curtains shorter so they wouldn't be floor length, and wouldn't collect so much dust. Then I ironed, and hemmed them on my sewing machine. Out of the scraps I was able to make another 2 short curtains for the window over the bed. The measuring was the hardest part, we don't have any table or floor space in the apartment large enough to spread out the curtains so I had to use 2 rulers and do it out on the back deck!

Ready to iron

TA DAA! Here are the 'after' shots of the bedroom:


Tuesday, March 27, 2012

Chickens, Beef, and Gift Tags


Last week I headed into the San Francisco Center for the Book to do some letterpressing. A friend of mine had found this great chicken letterpress image and asked me to print it. The form printed wonderfully and I was so enthused, I made a day of printing, making not only chicken cards, but also some beef cards and gift tags from the scraps.

I tried to make the perfect 'chicken orange' but I just ended up with regular orange. Oh well.

Chicken form, ready for printing

The cards got yellow and red envelopes.

I packaged the cards for my friend, using an old magazine page as the wrap.

Beef cards in the same style

Inked press, ready to print some gift tags

I made 5 different gift tags with various font colors, besides the 'hi friend' ones, I made tags that said 'awesome', 'hey there', 'love you', and 'why hello'.

I wrapped the cards, envelopes, and some gift tags for my friend in old encyclopedia pages and tied them with fancy kitchen twine.